Hal.dll is a type of error in Windows 7 with which some of the windows 7 users might be familiar. Hal stands for ‘Hardware abstraction layer while Dll refers to ‘Dynamic Link library’. This Hal.Dll is actually an important file in Windows 7 that contain several useful instructions which is being used by the programs and functions to complete the work. Now a situation might occur when this file is not loaded correctly and the Windows can’t start. This gives rise to the Hal.dll Errors in Windows 7. This error takes place after the computer starts, but before the system is fully started.
The Hal.dll Errors in Windows 7 is displayed in several ways such as ‘the HAL is missing or corrupt’ or ‘cannot find the’ \Windows\System32\hal.dll’. This error arises mainly for two reasons and these are: either the Hal.dll file is deleted or corrupted or because of the damaged hard drive.
File path too long error is another issue on windows 7 which can be fixed easily by clicking on this link.
Also read- How to fix blue screen error on windows 7
The best potential fixes are listed here.
Ways to fix Hal.dll errors in Windows 7
Method 1: Restart the computer
Sometimes a temporary issue is the cause of this problem and a simple restart will help you get out of this. So, first reboot the system before going ahead to perform any other steps and check if the problem is solved. If not, follow the other below methods one by one.
Method 2: Easy Recovery Essentials
Sometimes this error happens when the BCD is misconfigured and windows 7 try loading the file from an incorrect location. If this is the scenario, an Easy recovery Essentials will fix the issue soon. This Easy recovery Essentials is actually the rebuilding process of boot loader and BCD in windows. This is a very useful method that can definitely fix the issue. The step by step process to perform this step is here:
- First download the Easy recovery Essentials by clicking on this
Once downloaded, burn the bootable ISO image using the instruction carefully. - Now boot up your system from that Easy recovery Essentials CD/USB anything that you have created.
- When this Easy recovery Essentials starts running, click on the ‘Automated repair’ option and the continue button to go ahead with the process.
- The computer will be scanned fully and you need to select the drive for the windows installation then. Again, click on the ‘Automated repair’ button.
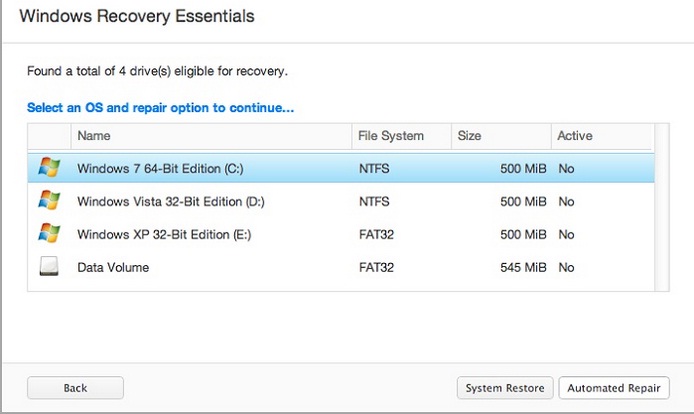
Image source – educatesierraleone.com
- Now ERS will start to examine the drive that you selected and all the errors related to disk, partition, boot sector, registry, filesystem, bootloader will be repaired automatically.
- Wait for a few minutes and let the process complete. Once done, just click on the restart button to restart the system. This will most probably fix the issue for you.
Method 3: Start-up repair
Start up repair is another useful process to fix Hal.dll errors in Windows 7 for which you do not have to download or install any other tool but it requires the windows set up disc. This process is fully automated where the problem is diagnosed and repaired automatically. Just follow the steps to make use of this method.
- You must have the Windows installation DVD which is required to insert in the CD ROM drive.
- Now shut down the PC completely and turn it back on.
- When the message ‘Press any key to boot from CD or DVD’ is shown on the screen, press any key on the keyboard.
- Next, select the language and keyboard and click on the option ‘Repair your computer’ located at the bottom left corner.
- The system will be scanned after which you need to select the install from the shown list.
- Various recovery options will be displayed, and you will have to click on the start-up repair link.
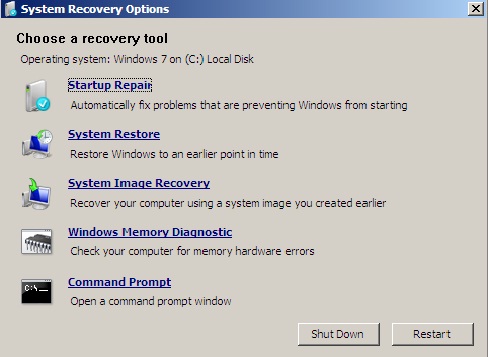
Image source – neosmart.net
- This will start diagnosing the issues along with repairing them.
Method 4: perform clean install of windows 7
If you have tried all the above methods and the situation is still same, a clean install of the Windows 7 might fix the issue. This process is really helpful where everything on the hard drive is deleted and a fresh copy of windows 7 is installed.
So, try performing the steps one by one and one of them will fix the issue for you.